Ever wondered how to smoothly send your inventory to Walmart’s Fulfillment Centers?
Navigating WFS can be tricky, but it doesn’t have to be. By the end of this comprehensive guide, you’ll master the ins and outs of shipping inventory to WFS—from obtaining that crucial UPC barcode to selecting the best shipping options.
The Crucial Step of WFS Registration
Before you even think about creating shipment plans or sending your inventory to Walmart’s fulfillment centers, there’s one non-negotiable step—registration in the WFS program. Failing to register can effectively lock you out of Walmart’s robust fulfillment ecosystem.
If you’re new to WFS and haven’t registered yet, this is the first thing you need to do.
So, how do you go about this crucial step? Simply go to the Walmart marketplace website and click ‘Sign Up’. Then follow the steps that involve adding your contact info, business info, payment method, and so on.
Once you’ve created your Walmart seller account, you can apply for WFS. It’s really a straightforward process but if you need more help, you can check out How to Apply for Walmart WFS in 2023.
By registering for the WFS program, you’re setting the stage for a seamless flow of operations, from creating shipment plans to sending your inventory to the designated fulfillment centers.
This initial step is essential not just for compliance with Walmart’s protocols but also for optimizing your business for a smoother, more efficient inventory management process.
How To Convert Single Items to WFS Eligible
Creating a Walmart Fulfillment Services (WFS) shipment plan might seem like a daunting task, but with the right approach, it’s a straightforward process.
A well-crafted shipment plan is your first stepping stone towards utilizing Walmart’s extensive fulfillment capabilities.
So, let’s delve into a comprehensive, step-by-step guide that will help you master the art of creating a WFS shipment plan.
Step 1: Get the UPC Barcode
The first step is to get the UPC barcode for the item you want to add. You can get this UPC barcode either by sifting through the source code of the product page. Or you can get the UPC by using the Ecom Circles extension.
Step 2: Log into Walmart Seller Center
Once you get the UPC code, navigate to the “Product Catalog” and then to “Items.”

Step 3: Add the New Item
Click on “Add Items.” Then choose “Add single item.”
Paste the copied UPC code into the search box. Hit “Enter.”
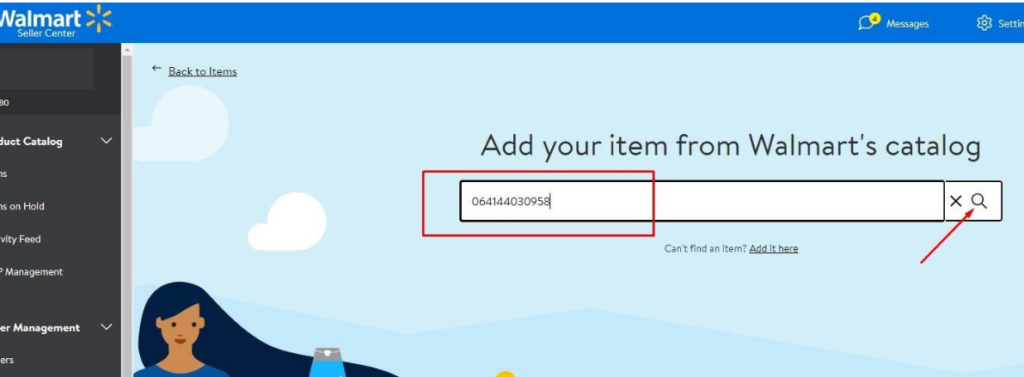
Step 4: Fill in Item Details
Once you search for the UPC code, the item will come up. Click “Add item.” Fill in the SKU by using the initials of your name followed by the UPC code number.
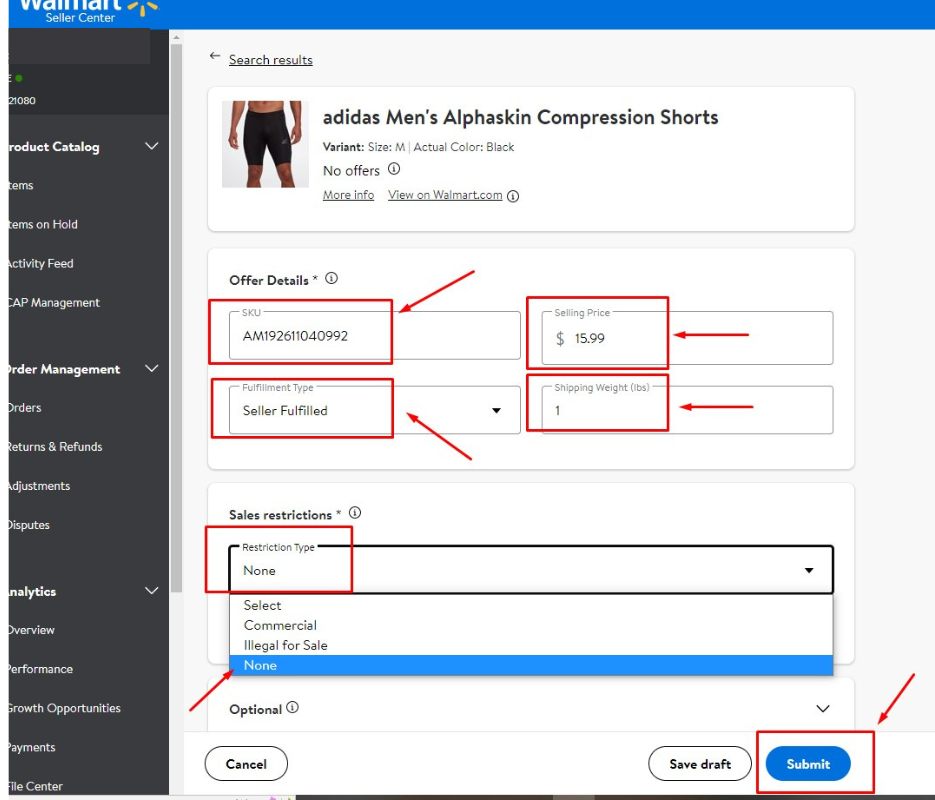
Input the Selling Price. Obtain the Shipping Weight from either the Walmart or Amazon website and paste it into the shipping weight box.
For “Fulfillment Type,” choose “Seller Fulfilled.” For “Restriction Type,” select “None.”
Click “Submit.”
Step 7: Convert Item to WFS Eligible
Once the item status shows as “Published” in Walmart Seller Central, you can convert it to be WFS eligible.
Go to “Items,” paste the SKU into the search box, and hit “Enter.” Select the item, click “More,” and then choose “Convert to WFS.”
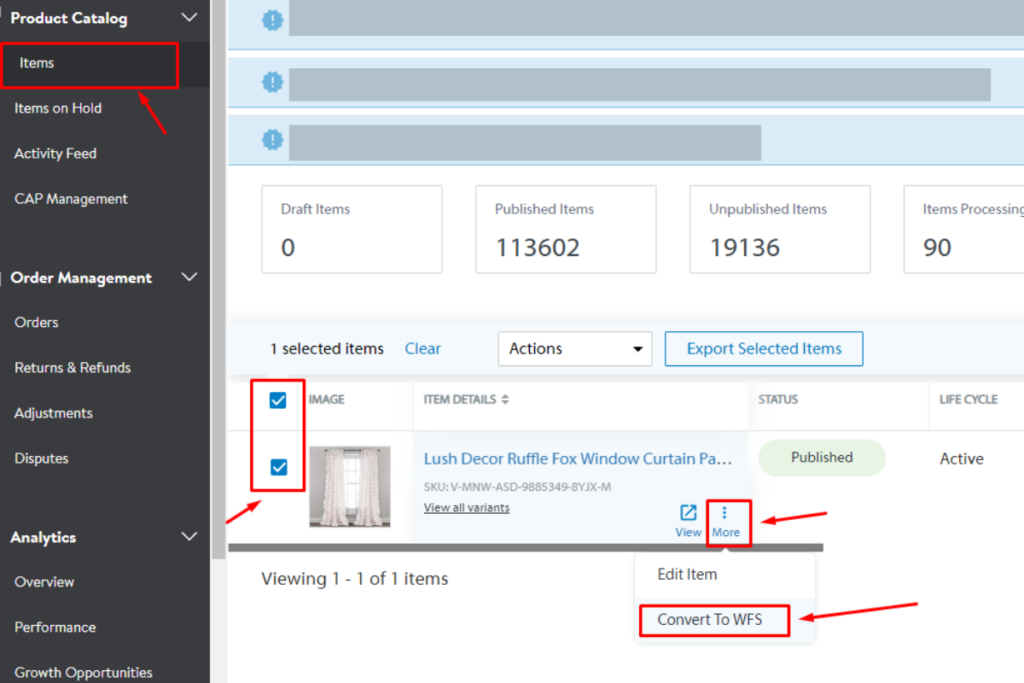
Step 8: Confirm Conversion
Verify if the item has been successfully converted to WFS Eligible by checking its “Fulfillment Type” status after an hour.
Once you have converted this item to WFS eligible, your item will be picked up and shipped via the fulfillment method.
How To Send Inventory to WFS
Now that you know how to convert an item to WFS-eligible, you should also learn how to send to WFS. This is a little complicated but with the right guide, you’ll get a hang of it.
That said, here are the steps to send inventory to WFS:
Step 1: Create Inbound Order
To send your items to WFS, you need to create what is called a ‘Shipment Plan’. To do that, you start with creating an inbound order.
First, log in to Walmart Seller Center, scroll down to the WFS tab, and click ‘Shipment’. This will take you to a page to begin your shipment preparation.
Subsequently, when you visit this page, you’ll see your previous shipments as well.
Next, click on ‘Send Inventory’ on the top right corner of the page.
Once you do that. you’ll be taken to a page to begin the process. Fill in the Expected Delivery Date.
This date is flexible; it’s just an estimate, we recommend giving about 3 days from the time you create this shipment plan. It’s not a hard and fast rule, you can choose any date that aligns with your delivery plan.
Then, use the search bar to find the items you wish to send to WFS. You can search using the Item Name, Item ID, SKU, UPC, GTIN, or EAN.
You can only add items that are WFS-eligible. So if the item is not eligible, you need to refer to the previous section to convert it first, then continue with this process.
Once the item is added, input the quantity you wish to send. Specify the Pack Configuration, either Case Pack or Individual Units.
If you choose Case Pack, input Units Per Case.
Important Note on Labeling
Walmart accepts only UPC codes, EAN, or GTIN codes for labeling. If your items are not labeled with either, you can opt for Walmart’s standard label service at a cost of 45 cents per unit.
Once all details are filled in, click Submit.
Step 2: Acknowledging and Preparing Shipments
After submitting, click View Shipments, and then Acknowledge. You will see your new shipment. Click Prepare Shipment.
Confirm all details and head to the Shipment and Labeling section.
Step 3: Choosing a Carrier
The next step is to choose a carrier. You can opt for WFS Preferred Carrier or any other carrier of your choice.
First, fill in your shipping address.
Then select Small Parcel if your shipment is small, and click Enter Package on Web.
Step 4: Finalizing Shipment Details
Once you choose a carrier, the next thing is to finalize your shipment details.
Choose Multiple Boxes if you are sending more than one box. Then input the Number of Packages, Box Weight, and Dimensions.
Opt for a Single SKU if you have only one SKU in your case. But if you have a case with different products (i.e. different SKUs) then you
Click Confirm and Calculate Charges.
Step 5: Estimated Costs and Label Generation
Lastly, you have to Review the estimated shipping cost and click I Agree to accept the charges.
After that, generate carrier labels and receiving labels. Then print and attach the labels to each box. This step is very crucial as it’ll help Walmart identify your inventory and ship to the appropriate destination.
How To Send Bulk Inventory to WFS
Now the above method is to send an item or a couple of items to WFS. There are times where you’ll want to send a lot more than a couple of items or upload a list of inventory from your suppliers.
Luckily, Walmart offers a way to do this.
The process is sort of similar to the one above with minor adjustments. First, you go to where you had the ‘Create Inbount Order’ button, i.e. WFS > Inventory > Send Inventory
Then follow the steps below:
Step 1: Download and Fill the Template
Instead of clicking ‘search Items’ like you did for sending a single item, you click ‘Upload’ instead. You will be asked to download the template and then you have to fill it with information such as product type, product ID, SKU, description, quantity, labelling, etc.
Save the file and upload it back to Walmart Seller Central. Then submit the template and acknowledge.
Step 2: Prepare the Shipment
Select the Inbound Order ID and click “Prepare Shipment.”
Follow on-screen instructions to complete the shipment preparation, including selecting shipment and labeling options, entering package details, and accepting charges.
Lastly, generate the shipping box labels and save them as a PDF.
Remember, preparation is key, and a well-crafted shipment plan is your first step towards a successful business on Walmart Marketplace.
By following this detailed guide, you’ll be better poised to meet customer demands, thereby laying a strong foundation for your eCommerce business to thrive.
Feel free to refer back to this guide as you navigate the complexities of Walmart Fulfillment Services, and best of luck with your next shipment!
Final Word
Navigating Walmart Fulfillment Services doesn’t have to be a daunting task. This guide has walked you through the essentials—from registering your items for WFS to crafting your shipment plans.
Now it’s time to put this knowledge into action. Whether you’re a newcomer or a seasoned seller, applying these insights can set your eCommerce business on the path to success.


